I didn't post my bridle tree barn raising project on the facebook group yet but I've been putting photos of this on my instagram as I built it. I've recently fallen in love with book nooks and I realized that having a tiny stable for my bookshelf would be a great project for the already busy month of December.

I think it came out pretty good! It's scaled to fit my schleich horse.
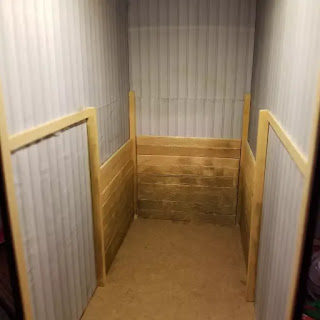
I started cutting popsicle sticks to fit and put 1/4in square dowels in the corners. I did not glue them down yet but I did glue the popsicle sticks to each other to make the wall.

I printed out the gray sheet metal panels from Desktop Stables barn, big thanks for that! I had to size them down to schleich scale which took a bit of trial and error, then I did my best to line them up! I found that a glue stick worked the best for getting them to stick on the walls without glue seeping through.

There's been a lot of talk in the hobby about messy more realistic barns recently and I could not agree more! Nothing gets more gross than a stall wall. I once took a handywoman job of painting the interiors of stalls white. It was probably one of the biggest wastes of time ever, next day the horses had already messed it up but hey it wasn't my barn.
Anyway, I glued my messy walls on the sides of the book nook, making sure not to interfere with the teeth in the back or it would not have closed properly. This is one of the major benefits of a book nook, it is super easy to work on each side before putting everything together.

It's a bit of a tight fit for the horse but I only had so much room to work with. Luckily, plastic horses don't complain much.
After this point I put on my door with some tiny cabinet hinges I bought from factory direct crafts. I did a big oops of not paying attention because the door is actually too long, I forgot to account for the space of the hinges. By the time I realized, it was already glued on.

I decorated it a bit and started adding details. One detail I love is this bulletin board. I got the printouts from Kenzie Williamson on the bridle tree facebook page. It is amazing. I built the frame with black painted coffee stirrers. There are actually two layers of background. I used thin cardboard as the original background that I glued the frame on. Then I cut another piece of thin cardboard that fit inside the frame. That way I can change out the board if I feel like. The top board is just held in by a piece of double sided tape.


I followed this youtube tutorial to make my mini haybales, https://www.youtube.com/watch?v=DFo3J8W4Qpg
Another big thanks to Nichelle at Desktop stables who not only provided the sheet metal wall printouts but also has a fantastic pattern for a cloth hay bag which I followed for schleich scale!
And thanks to Kenzie Williamson for the printout for the bulletin board and the really cute idea! It really makes the barn more realistic.
I think that this is something many members of the Model Horse community do well, sharing information, patterns, tips and just helping each other. It makes it a great hobby to be a part of. I hope everyone has Happy Holidays!


