Sunday, November 26, 2023

Upgrading a Wreath, horse girl style

 So I'm just doing some more tiny Christmas decorating over here and figured I'd share the process as I go.


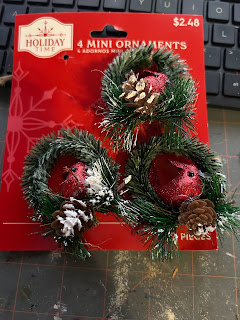
I started with the walmart wreathe ornaments with the bird.


I had some partially customized mini whinnies I was probably never going to do anything with and some fun metallic acrylic paint.


It took me about 3 coats to get the horse fully coated, might take less if you prime.


Then I glued and clamped it on. This was super easy and not only do the make excellent barn decorations, they could work just as well on a real tree.


Tada!


Saturday, November 25, 2023

Sign Boards

So I went to Walmart where they have all the Christmas décor out and they had an entire section devoted to small tree ornaments. I definitely wanted all of them but settled for buying these lovely wreaths which besides the bird are in scale.

There were some other cool ornaments that would have been in scale-ish but I only have so much stall to decorate. The star things would look great too but I wished they were horses instead.


So anyway, I saw these cute "signs" for the tree and thought, I could definitely make something like that.


All you need is glue/modge podge, some jumbo popsicle sticks, and a printer (the normal paper kind).


Glue the sign on the popsicle stick or modge podge it on, dealers choice.


Next cut out the sign with either an exacto knife or a miter box.
Then just paint the edges a similar color.


I did the garlands by bending some christmas tree pipe cleaner things I got a joanns years ago and still am not through, then just added a bow to the middle.


Monday, July 10, 2023

Arena Background Tutorial


So I was at joanns picking up supplies to wallpaper my 1:12 farmhouse when I stumbled on these amazing corrugated scrapbook paper sheets and I just knew they would look amazing on an arena backdrop. I've been meaning to make one of these for a long time and everything was on sale so it was even better. I did have a bunch of the supplies at home but overall at full price, this is still a pretty cheap project ~$25. Now I just need to get better footing than my bathroom counter.


Supplies

  • Wood board (12"x24") I got mine at joanns 
    • (could use cardboard instead, would not be as sturdy but cheaper)
  • 2x Corrugated Scrapbook paper (joanns)
  • 19x 3/8" wide wood strips at least 12" long (amazon)


  1.  I glued on the corrugated paper first, having it extend about 3in above the top of the board. It would have been better to measure out exactly how many wood strips for the bottom and base offset on that but I figured that out after everything was put together.🙃

2. I glued on a long board in the middle covering the seam between the two pieces of the corrugated paper then I glued one along the two ends.

3. Finally I cut and glued strips on for the bottom of the wood sides of the arena.


It was a lot more simple than I thought it would be so it's not a super elaborate tutorial but hopefully it helps.

It definitely makes my photography look even more realistic.


Friday, June 16, 2023

Wheel Good Deals

I'm super excited for Breyerfest this year, even if I can't afford to go in person. I've always loved driving and I spent much of my childhood driving my hackney pony, Star. 


My first piece of model horse tack was a driving harness for my breyer hackney pony to match the real one and one of the things I wanted most was a cart. When I built my first cart, the biggest issue was finding appropriately sized wheels to use. When I designed ones for 3d printing I was surprised that all these years later, scale wheels were still hard to find. 


I will continue having them in my shop, but for anyone with a 3D printer, I have uploaded them to thingiverse (https://www.thingiverse.com/thing:6081635) and you are welcome to print and use them. I have no issues with anyone selling something they make with them, these are a component. But please do not sell the wheels.

To everyone still finishing up their Breyerfest projects I wish you the best of luck and I hope everyone has a wheel-y great breyerfest!


Saturday, June 3, 2023

Visiting Horse College

I helped my sister move out of her barn after she graduated and I figured there might be in some interest in the equine center at Murry State. 


The main building had classrooms and offices. There was also a really cool display of their ribbons and I'm definitely going to be trying to make a ribbon wreath at some point.


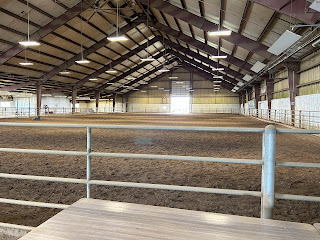
They have a massive arena which my sister said she took a lot of riding classes in. 


The pastures were decent sized and very pretty although I don't think the horses liked eating the yellow flowers too much. 


The student barn was... a barn. The cool part was that they had ramps to get up into the hay loft which made it way easier to move all of her horse stuff out. 


The stalls were pretty decent. Murry State lets students board their horses there even if they are not members of the equestrian teams.


They also had two foals which were very cute! Part of the curriculum was to be on foal watch with the students taking turns.


There were also some friendly barn kitties!


Overall it looked like a very cool place to study and very nice barns. Plus they have a horse as their mascot!


Saturday, December 24, 2022

Barn Raising Challenge

 I didn't post my bridle tree barn raising project on the facebook group yet but I've been putting photos of this on my instagram as I built it. I've recently fallen in love with book nooks and I realized that having a tiny stable for my bookshelf would be a great project for the already busy month of December.


I think it came out pretty good! It's scaled to fit my schleich horse.

I started cutting popsicle sticks to fit and put 1/4in square dowels in the corners. I did not glue them down yet but I did glue the popsicle sticks to each other to make the wall.

I printed out the gray sheet metal panels from Desktop Stables barn, big thanks for that! I had to size them down to schleich scale which took a bit of trial and error, then I did my best to line them up! I found that a glue stick worked the best for getting them to stick on the walls without glue seeping through.


There's been a lot of talk in the hobby about messy more realistic barns recently and I could not agree more! Nothing gets more gross than a stall wall. I once took a handywoman job of painting the interiors of stalls white. It was probably one of the biggest wastes of time ever, next day the horses had already messed it up but hey it wasn't my barn. 

Anyway, I glued my messy walls on the sides of the book nook, making sure not to interfere with the teeth in the back or it would not have closed properly. This is one of the major benefits of a book nook, it is super easy to work on each side before putting everything together.


I put the nook together as well as my stall. I also put strips of wood (coffee stirrers) along the seem on the side. I think it made it look better and lots of metal barns have framing on the inside.


It's a bit of a tight fit for the horse but I only had so much room to work with. Luckily, plastic horses don't complain much.

After this point I put on my door with some tiny cabinet hinges I bought from factory direct crafts. I did a big oops of not paying attention because the door is actually too long, I forgot to account for the space of the hinges. By the time I realized, it was already glued on. 


I decorated it a bit and started adding details. One detail I love is this bulletin board. I got the printouts from Kenzie Williamson on the bridle tree facebook page. It is amazing. I built the frame with black painted coffee stirrers. There are actually two layers of background. I used thin cardboard as the original background that I glued the frame on. Then I cut another piece of thin cardboard that fit inside the frame. That way I can change out the board if I feel like. The top board is just held in by a piece of double sided tape. 


I think everything turned out pretty cute!

 I followed this youtube tutorial to make my mini haybales, https://www.youtube.com/watch?v=DFo3J8W4Qpg

Another big thanks to Nichelle at Desktop stables who not only provided the sheet metal wall printouts but also has a fantastic pattern for a cloth hay bag which I followed for schleich scale!

And thanks to Kenzie Williamson for the printout for the bulletin board and the really cute idea! It really makes the barn more realistic.

I think that this is something many members of the Model Horse community do well, sharing information, patterns, tips and just helping each other. It makes it a great hobby to be a part of. I hope everyone has Happy Holidays!



Thursday, December 1, 2022

DIY Miniature Stockings

I'm starting to get into the holiday spirit now that it is officially December! And that means getting my miniature stalls all festive too! So I came up with this easy DIY for stockings and figured I'd share it. These are no-sew since my sewing machine needs a bit of repairs and much like everything that is backlogged a lot. These use a really small amount of fabric so perfect for using up some scraps too!


Materials/tools:
Fabric in small print pattern or plain
Flannel (I used white)
Fabric Glue (I used liquid stitch)
Ribbon
Clips to hold stuff together while it drys
Sharp scissors


Pattern:

  1. Cut out two pieces of fabric, making sure to flip the pattern over for the second piece.

2. Fold over a small amount of the top of each side and glue. Folding the good side of the fabric to the bad side.


3. On the good side of one piece glue around the edge, as close to the edge and as thin of a line as possible to maximize space in the stocking.

4. Place the 2nd piece good side down on the first. I clamp around the opening to get a strong seal.

5. Once the glue has dried (I usually wait overnight) turn the stocking inside out. Press it down with your fingers to flatten and use a marker to push out the seems on the inside. Careful not to poke a hole through the glue. On the left you can see what it will look like once turned and on the right is after I pushed out the inside and flattened the top part a bit.

6. Cut a strip of fleece approximately 1/2 inch wide and glue to the top of the stocking. Also cut a small piece of ribbon. Fold the ribbon in half and glue it together to for a loop, then glue to the back of the stocking so it can be hung.

7. Fill with Christmas goodies and hang!


Upgrading a Wreath, horse girl style