Monday, December 31, 2018

Obligatory New Year's Goals Post

Hello 2019! May you be even better than 2018 which you know will be kinda hard but I believe in you! Some memorable moments of 2018 were: finally graduating college (yes, I'm actually an engineer now... fear me! Mwahahaha... *cough), opening my etsy shop where I managed to sell all of the tack I posted, and acquiring a herd of tiny plastic dinosaurs. But just you wait, next year is going to be even BETTER!!!!

For starters I'm going to be moving cross country from a little town in Wisconsin all the way to Austin Texas to reunite with my significant other! Super hyped about that. We've been long distance ever since he decided to graduate (he's a year above me) and move far far far away to get a cool job with planes and stuff... So my studio will be on the move very soon.

But moving studio or not, stuff is gonna get done in 2019! My goals have gotten bigger from last year  (mainly because I didn't really have any) and without further ado:

  1. Keep up the good work, blogwise. This is a very young blog and I'm proud to say that it is getting lots of TLC. And my goal is to give it even more TLC!
  2. Improve my tack making skills. So far, I've really only made a couple of western saddles and three harnesses. These are things I am familiar. Maybe I should try to branch out or I could work to improve these two things or because I really like a good challenge... I'm gonna try to do both.
  3. Up my crochet game. I spend a lot of time on this blog working on model horse, but I definitely do a lot of crochet. And I'm going to keep on doing that.
  4. Grow my etsy shop. At this point I've sold out of all of my tack and I've just got a smattering of small crochet items left. I'm going to try to restock it pretty often.
  5. Take more pictures. So often when I'm doing something I get so in the zone that I don't think about taking pictures until it is way to late.

Tuesday, December 18, 2018

Pre-Christmas Goodies from Rio Rondo!

I put in my first order for the new year a little early so that I could surprise myself for Christmas with all the tackmaking materials I'm going to need for my New Year's resolutions. And Rio Rondo did not disappoint! I'm super excited to announce that I will be making 3 western saddle sets, 1 traditional size and two stablemate size! When I saw that Rio Rondo has started carrying bitty sized things I just had to get one of almost everything. I've been thinking about going down a few model sizes since I'm looking at a cross country move in my near future and I'll definitely have less space then. So of course it was like fate that I browsed their website and found out that they'd added a whole new line! (*random excited noises). Without futher ado, my haul:

Itty Bitty things!!!!

The corner plates are really detailed for how small they are!

Next come the bits, and it's two sets! Again the detail is superb!


Then we have tiny buckles!


And these cool strips of diamonds which will make some stunning bridles, I'm sure.


And fancy little cantle plates! Obviously these are going to be some blingy saddles!


Then there's the little stirrups. Again I am floored by the level of detail on such small items!


There are also traditional sized things!!!

Like all of the hardware pieces for my next saddle set!

And the saddle tree + seat!


New Leather!


I actually had a bunch of somewhat good leather that I've been meaning to use up. You can see the chew marks that Sirius left...

 He looks super guilty, right?


Sneak peek at one of my New Year's goals: I'm going to blog more, and by more I've decided to go through the process of making these saddles. Yup, that's my first step. If I can accomplish that (fingers crossed) then I'll find a new thing to blog about.

Wednesday, December 12, 2018

DIY Running River Diorama

I love diorama-ing but it is quite time consuming and a tad bit expensive. But why break the bank when you could make a stunning diorama on a budget? These probably won't make their way to my etsy shop as I have no idea how to ship something this delicate. But not going into etsy doesn't stop me from trying to make cool crafty stuff so here we go!

Supplies

  • Wooden board of any size or shape
  • Brown Paint
  • Elmers Glue/ tacky glue
  • Hot glue or Epoxy
  • Rocks big and itty bitty
  • Bushy stuff that you find at hobby lobby for shrubbery
  • Sticks
  • Artificial moss that might be by fairy garden stuff?
  • The model making terrain powder
  • Fine dirt
  • Clear silicon caulk
  • Caulk gun
  • Cheap disposable paintbrushes


Step #1
Put down the base coat. Pick a nice neutral brown. Mix up the browns and build. This is especially important if you plan on doing a water feature.


Step #2
Glue down all of the big stuff first. Branches, trees, rocks, shrubs, etc. I like using E6000 glue but epoxy works as well. Super glue will also work if it is the gel or you can use hot glue. If you put down the dirt and terrain sprinkle stuff as ground cover first, nothing will stick. (Learned that from experience)


Step #3
Using elmers or tacky glue paint it across the parts of the diorama that need dirt or terrain. I like using cheap paintbrushes for this. Sprinkle the dirt or terrain stuff on the glue and press down lightly. Don't just put it down in patches, try to mix textures and colors to make it look natural.


Step #4
The water feature.... Yes you can buy fake water stuff for about $20 OR you can get some clear silicon caulk from the hardware store for like $3. Put down a thin layer of caulk by squeezing it onto the diorama where you want your water feature. Then using a popsicle stick spread it out to make it nice and thin. You can work in ripples and stuff to make it natural.


Walah! One nice quick and easy diorama that won't be breaking the bank.

Saturday, December 8, 2018

Desktop Dinos: Christmas shenanigans

Long story short, my roommate keeps giving me little plastic dinosaurs. And if you give a crafty nerd little plastic dinosaurs it's a lot like giving a mouse a cookie... things... happen... The desktop dinos are all ready for Christmas. Enjoy the cheer!


Sunday, December 2, 2018

DIY Crochet Mini Stocking Pattern

It's that time of year again, gotta hurry up on making those last minute presents and suddenly someone you only kinda know hands you a mug or some other little gift. This is one of my favorite go to gifts to have on hand in event of this. Give them a little stocking filled with some festive candy or trinkets and bada bing bada boom you've saved yourself from a lot of Christmas awkwardness.

Estimated time: 1hr
Hook: US H


This is a very customizable pattern, if you want to change color anywhere just do so.

Abbreviations
st - stitch
ch - chain
sc - Single crochet
hdc - Half double crochet
slst - Slip stitch

The chain 2 counts as a hdc

Toe
R1: Ch 3, 6 hdc in 1st ch, join with top of ch 3 (7)
R2: Ch 2, 1 hdc in same st, 2 hdc in each st around, join with top of ch 2 (14)
R3: Ch 2, * 2 hdc in next st, 1 hdc in next st, repeat from *, join with top of ch 2 (21)
R4: Ch 2, hdc in each st around, join with ch 2 (21)
R5-7: repeat R4


Heel
R8: Ch 2, hdc in next 10 st, turn (11)
R9: Ch 2, hdc in next 10 st, turn (11)
R10-11: Repeat R9
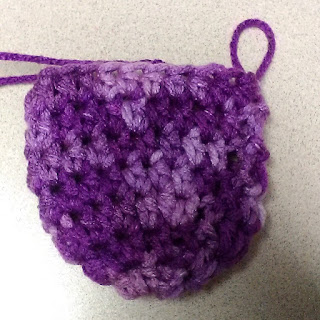
R12: Fold the heel in half as shown in the picture below, sl st the edges together as shown. Fasten off and invert.


Tube
R13: Attach yarn to back of heel as shown. Ch 2, hdc in each st around rim (approx 26)


R14: Ch 2, hdc in each st (approx 26)
R15-18: Repeat R14
R19: Optional. I changed color and sc around (approx 26)

Loop for hanging
At the end of R18 or R19 chain 10 then slst into top of ch 2 or ch 1, Fasten off
Weave in ends.

Upgrading a Wreath, horse girl style